


✍ Posted by Immersive Builder Seong

1. Terraform 기본 개념
Terraform 이란?
HashiCorp에서 공개한 인프라스트럭처를 코드로 프로비저닝하고 관리할 수 있는 오픈소스 도구입니다.
- HCL(HashiCorp Configuration Language) 기반으로 코드를 작성합니다.
- Terraform Provider가 제공하는 API를 호출하여 대상 리소스와 상호작용합니다.
- Write-Plan-Apply 3단계의 워크플로우로 동작합니다.

Windows 환경에 Terraform 설치하기
Terraform을 실행하기 위한 별도 관리서버를 구성하거나 Terraform Cloud를 이용하는 방법 등 여러가지가 있지만,
이번 실습에서는 Terraform의 기본 사용법을 익히는 것이 목적이므로 로컬에 설치하여 테스트할 예정입니다.
Windows 환경에 Terraform을 설치하는 방법에는 2가지가 있습니다.
1) Windows에 Terraform 직접 설치
2) WSL2를 실행하여 Terraform 설치(권장)
Powershell 또는 cmd 등 윈도우 터미널에서 사용하는 것보다
WSL2에서 지원하는 패키지와 툴이 훨씬 다양하기 때문에 2)번 방법을 채택하겠습니다.
Step1. WSL2 설치
1. PowerShell 관리자 권한 실행
> dism.exe /online /enable-feature /featurename:Microsoft-Windows-Subsystem-Linux /all /norestart
> dism.exe /online /enable-feature /featurename:VirtualMachinePlatform /all /norestart
2. 재부팅 후 WSL2 리눅스 커널 업데이트
> wsl_update_x64.msi
3. WSL 버전 2 설정
> wsl --set-default-version 2
4. MS Store> Ubuntu 앱 설치
5. Ubuntu 실행 후 사용할 계정명과 패스워드 입력
Step2. Terraform 설치
# Terraform 설치
$ wget -O- https://apt.releases.hashicorp.com/gpg | sudo gpg --dearmor -o /usr/share/keyrings/hashicorp-archive-keyring.gpg
$ echo "deb [signed-by=/usr/share/keyrings/hashicorp-archive-keyring.gpg] https://apt.releases.hashicorp.com $(lsb_release -cs) main" | sudo tee /etc/apt/sources.list.d/hashicorp.list
$ sudo apt update && sudo apt install terraform

# Terraform 버전 확인
$ terraform version
Step3. 그 외 Tool 설치
# AWS CLI 설치
$ curl "https://awscli.amazonaws.com/awscli-exe-linux-x86_64.zip" -o "awscliv2.zip"
$ unzip awscliv2.zip
$ sudo ./aws/install

# AWS CLI 버전 확인
$ aws --version

# AWS 자격 증명
$ aws configure

# EKSCTL 설치
$ ARCH=amd64
$ PLATFORM=$(uname -s)_$ARCH
$ curl -sLO "https://github.com/eksctl-io/eksctl/releases/latest/download/eksctl_$PLATFORM.tar.gz"
$ curl -sL "https://github.com/eksctl-io/eksctl/releases/latest/download/eksctl_checksums.txt" | grep $PLATFORM | sha256sum --check
$ tar -xzf eksctl_$PLATFORM.tar.gz -C /tmp && rm eksctl_$PLATFORM.tar.gz
$ sudo mv /tmp/eksctl /usr/local/bin

# KUBECTL 설치
$ curl -O https://s3.us-west-2.amazonaws.com/amazon-eks/1.28.8/2024-04-19/bin/linux/amd64/kubectl
$ curl -O https://s3.us-west-2.amazonaws.com/amazon-eks/1.28.8/2024-04-19/bin/linux/amd64/kubectl.sha256
$ sha256sum -c kubectl.sha256
$ openssl sha1 -sha256 kubectl
$ chmod +x ./kubectl
$ mkdir -p $HOME/bin && cp ./kubectl $HOME/bin/kubectl && export PATH=$HOME/bin:$PATH
$ echo 'export PATH=$HOME/bin:$PATH' >> ~/.bashrc

# KUBECTL 버전 확인
$ kubectl version --client

# HELM 설치
$ curl https://baltocdn.com/helm/signing.asc | gpg --dearmor | sudo tee /usr/share/keyrings/helm.gpg > /dev/null
$ sudo apt-get install apt-transport-https --yes
$ echo "deb [arch=$(dpkg --print-architecture) signed-by=/usr/share/keyrings/helm.gpg] https://baltocdn.com/helm/stable/debian/ all main" | sudo tee /etc/apt/sources.list.d/helm-stable-debian.list
$ sudo apt-get update && sudo apt-get install helm

# HELM 버전 확인
$ helm -v

# tree, jq 설치
$ $ sudo apt install -y tree jq
Step4. VSCode Settings
Extensions 설치 항목 :
- HashiCorp HCL : HCL 파일 문법 강조
- HashiCorp Terraform : Terraform 문법 강조
- Graphviz Interactive Preview : 리소스 간 의존성 관계 도식화
- WSL : WSL 디렉토리 접근
EC2 인스턴스 배포
Step1. Amazon Linux 2 최신 이미지 ID 조회
$ AL2ID=`aws ec2 describe-images --owners amazon --filters "Name=name,Values=amzn2-ami-hvm-2.0.*-x86_64-gp2" "Name=state,Values=available" --query 'Images|sort_by(@, &CreationDate)[-1].[ImageId]' --output text`
$ echo $AL2ID
ami-0217b147346e48e84
Step2. 구성 파일 작성하여 EC2 인스턴스 배포
Step3. 배포 결과 확인

Step4. EC2 인스턴스 Tag 추가
Step5. Tag 추가 확인
인스턴스 Name과 같은 속성이 추가될 경우에는 리소스 삭제/재생성 과정을 거치지 않고 온라인으로 변경됩니다.
# aws_instance.example will be updated in-place
~ resource "aws_instance" "example" {
id = "i-0f5567fc218c37077"
~ tags = {
+ "Name" = "okms1017-bastion"
}
~ tags_all = {
+ "Name" = "okms1017-bastion"
}
# (38 unchanged attributes hidden)
# (8 unchanged blocks hidden)
}

* terraform state list
- Terraform을 실행하여 배포한 리소스 목록을 보여줍니다.
$ terraform state list
aws_instance.example
* terraform show
- 리소스의 상세 정보를 보여줍니다.
- terraform state show [리소스 유형].[리소스명] : 특정 리소스의 상세 정보 출력
# aws_instance.example:
resource "aws_instance" "example" {
ami = "ami-0217b147346e48e84"
arn = "arn:aws:ec2:ap-northeast-2:732659419746:instance/i-0f5567fc218c37077"
associate_public_ip_address = true
availability_zone = "ap-northeast-2a"
cpu_core_count = 1
cpu_threads_per_core = 1
disable_api_stop = false
disable_api_termination = false
ebs_optimized = false
get_password_data = false
hibernation = false
host_id = null
iam_instance_profile = null
id = "i-0f5567fc218c37077"
instance_initiated_shutdown_behavior = "stop"
instance_lifecycle = null
instance_state = "running"
instance_type = "t2.micro"
ipv6_address_count = 0
ipv6_addresses = []
key_name = null
monitoring = false
outpost_arn = null
password_data = null
placement_group = null
placement_partition_number = 0
primary_network_interface_id = "eni-027c61b817b50a1d4"
private_dns = "ip-172-31-12-114.ap-northeast-2.compute.internal"
private_ip = "172.31.12.114"
public_dns = "ec2-43-202-56-155.ap-northeast-2.compute.amazonaws.com"
public_ip = "43.202.56.155"
secondary_private_ips = []
security_groups = [
"default",
]
source_dest_check = true
spot_instance_request_id = null
subnet_id = "subnet-3b06d650"
tags = {
"Name" = "okms1017-bastion"
}
tags_all = {
"Name" = "okms1017-bastion"
}
tenancy = "default"
user_data_replace_on_change = false
vpc_security_group_ids = [
"sg-5bfeaf3e",
]
capacity_reservation_specification {
capacity_reservation_preference = "open"
}
cpu_options {
amd_sev_snp = null
core_count = 1
threads_per_core = 1
}
credit_specification {
cpu_credits = "standard"
}
enclave_options {
enabled = false
}
maintenance_options {
auto_recovery = "default"
}
metadata_options {
http_endpoint = "enabled"
http_protocol_ipv6 = "disabled"
http_put_response_hop_limit = 1
http_tokens = "optional"
instance_metadata_tags = "disabled"
}
private_dns_name_options {
enable_resource_name_dns_a_record = false
enable_resource_name_dns_aaaa_record = false
hostname_type = "ip-name"
}
root_block_device {
delete_on_termination = true
device_name = "/dev/xvda"
encrypted = false
iops = 100
kms_key_id = null
tags = {}
tags_all = {}
throughput = 0
volume_id = "vol-0e8c169c594a10842"
volume_size = 8
volume_type = "gp2"
}
}
Step6. 리소스 삭제
$ terraform destroy -auto-approve
HCL
IaC와 구성정보를 명시하기 위해 개발된 코드 문법입니다.
- Terraform의 코드 영역
- Infrastructure를 코드로 표현하고 선언적 특성을 가집니다.
- 프로그래밍 언어처럼 조건문/반복문/함수 처리 동작이 가능합니다.
- 버전 관리를 통해 히스토리를 관리하고 협업 기반을 제공합니다.
* HCL vs JSON
| HCL을 이용한 Terraform 구성 | JSON을 이용한 CloudFormation 구성 |
| resource "local_file" "abc" { content = "abc!" filename = "${path.module}/abc.txt" } |
{ "resource": [ { "local_file": [ { "abc": [ { "content":"abc!", "filenale":"${path.module}/abc.txt" } ] } ] } ] } |
| name = “{$var.PilotServerName}-vm” | “name”:”{”Fn::Join”:[”-”,[PilotServerName,vm]]}” |
블록
Terraform 구성을 명시하기 위해 `{ }`로 구분되는 단위입니다.
Terraform 버전이나 Provider 버전과 같은 값들은 자동으로 설정되지만
공동 작업 시에는 버전을 명시적으로 선언하고 필요한 조건을 입력하여 실행 오류를 최소화할 것을 권장합니다.
중요한 것은 코드를 오늘 실행하든 3년 후에 실행하든 동일한 결과를 얻을 수 있어야 합니다.
- Terraform/Provider 블록 예시
terraform {
required_version = "~> 1.3.0" # 테라폼 버전
required_providers { # 프로바이더 버전
random = {
version = ">= 3.0.0, < 3.1.0"
}
aws = {
version = "4.2.0"
}
}
cloud { # Cloud/Enterprise 같은 원격 실행을 위한 정보
organization = "<MY_ORG_NAME>"
workspaces {
name = "my-first-workspace"
}
}
backend "local" { # state 보관 위치 지정
path = "relative/path/to/terraform.tfstate"
}
}
- Provider 버전 작성 방법 : Terraform Registry 공식 페이지에서 제공하는 Provider 선택 후, [USE PROVIDER]를 클릭합니다.

Version
Terraform 버전 체계는 Semantic Versioning 방식을 따릅니다.
# version = Major.Minor.Patch
version = 1.3.4
- Major : 내부 동작의 API가 변경/삭제되거나 하위 호환이 지원되지 않는 버전
- Minor : 신규 기능이 추가/개선되고 하위 호환이 가능한 버전
- Patch : 버그 및 일부 기능이 개선된 하위 호환이 가능한 버전
| Version | 의미 | 고려사항 |
| 1.0.0 | v1.0.0만 허용 | Terraform을 업그레이드하기 위해서는 선언된 버전을 변경해야 함 |
| >= 1.0.0 | v1.0.0 이상 모든 버전 허용 | v1.0.0 버전을 포함하여 그 이상의 모든 버전을 허용함 |
| ~> 1.0.0 | v1.0.0을 포함한 v1.0.x 버전을 하용하고 v1.x는 허용하지 아니함 | 부버전에 대한 업데이트는 무중단으로 이루어짐 |
| >= 1.0, < 2.0.0 | v1.0.0 이상 v2.0.0 미만의 버전 허용 | 주버전에 대한 업데이트를 방지함 |
리소스 블록
리소스 블록은 선언된 항목을 생성하는 동작을 수행합니다.
resource “<PROVIDER>_<TYPE>” “<NAME>” {
[CONFIG ...]
}
- PROVIDER : 공급자명 ex) aws, azure, ncloud
- TYPE : 리소스 유형, 프로바이더 종속성 O ex) instacne, security_group, s3
- NAME : Terraform에서 사용하는 리소스명
- CONFIG : 인수, 사용자가 선언하는 값
Step1. 리소스 블록 선언
Step2. 배포 후 결과 확인

종속성
리소스, 모듈 선언을 통해 프로비저닝되는 각 구성 요소의 생성 순서를 정합니다.
기본적으로 다른 리소스의 값을 참조할 경우에는 생성 선후 관계에 따라 암묵적인 종속성을 가지게 되며,
메타인수인 'depends_on'을 사용하여 리소스 간 명시적인 종속성을 부여할 수도 있습니다.
- Case 1 : 종속성이 없는 경우
resource "local_file" "testA" {
content = "HashiCorp"
filename = "${path.module}/testA.txt"
}
resource "local_file" "testB" {
content = "Terraform!"
filename = "${path.module}/testB.txt"
}

- Case 2 : 묵시적인 종속성을 가지는 경우
resource "local_file" "testA" {
content = "HashiCorp"
filename = "${path.module}/testA.txt"
}
resource "local_file" "testB" {
content = local_file.testA.content
filename = "${path.module}/testB.txt"
}


- Case 3 : 명시적인 종속성을 가지는 경우 (depens_on)
resource "local_file" "testA" {
content = "HashiCorp"
filename = "${path.module}/testA.txt"
}
resource "local_file" "testB" {
depends_on = [
local_file.testA
]
content = "Terraform!"
filename = "${path.module}/testB.txt"
}


리소스 속성 참조
리소스 구성에서 참조 가능한 값은 인수와 속성입니다.
- 인수 : 리소스 생성 시 사용자가 선언하는 값 (Arguments)
- 속성 : 리소스 생성 후 획득 가능한 리소스의 고유한 값 (Attributes)
- 리소스 참조 예시
# <리소스 유형>.<이름>.<인수>
aws_instance.bastion.instance_type
# <리소스 유형>.<이름>.<속성>
aws_instance.bastion.id
데이터 블록
데이터 소스는 Terrraform으로 정의되지 않은 외부 리소스 또는 저장된 정보를 Terraform 내에서 참조할 때 사용합니다.
# 데이터 블록 선언
data "<리소스 유형>" "<이름>" {
<인수> = <값>
}
# 데이터 소스 참조
data.<리소스 유형>.<이름>.<속성>
Step1. 가용영역 정보를 가져오기 위한 데이터 블록을 선언합니다.
Step2. 데이터 소스 정보를 조회합니다.
$ terraform state list
data.aws_availability_zones.available
$ terraform state show data.aws_availability_zones.available
# data.aws_availability_zones.available:
data "aws_availability_zones" "available" {
group_names = [
"ap-northeast-2",
]
id = "ap-northeast-2"
names = [
"ap-northeast-2a",
"ap-northeast-2b",
"ap-northeast-2c",
"ap-northeast-2d",
]
state = "available"
zone_ids = [
"apne2-az1",
"apne2-az2",
"apne2-az3",
"apne2-az4",
]
}
* terraform console
- 터미널에서 별도의 콘솔을 실행하여 명령어 실행 결과를 테스트할 수 있습니다.
$ terraform console
> data.aws_availability_zones.available.names[0]
"ap-northeast-2a"
> data.aws_availability_zones.available.names[1]
"ap-northeast-2b"
> data.aws_availability_zones.available.zone_ids[0]
"apne2-az1"
> data.aws_availability_zones.available.zone_ids[1]
"apne2-az2"
변수
입력 변수는 코드의 변경 없이 여러 인프라를 생성하는데 목적이 있습니다.
# 변수 선언
variable "<이름>" {
<인수> = <값>
}
# 변수 참조
var.<이름>
- 변수명은 동일 모듈 내에서 고유하여야 합니다 .
- 다른 코드 내에서 참조할 수 있습니다.
- 예약어 : source, version, providers, count, for_each, lifecycle, depends_on, locals
- 변수 유형 : string, number, bool, any, list, map, set, object, tuple
- 내부에 validation 블록을 선언하여 유효성을 검사할 수 있습니다.
Step1. 패스워드를 입력 변수로 선언
Step2. Apply 실행 후 결과 확인
$ terraform apply -auto-approve
var.my_password
Enter a value: p@ssw0rd123

* sensitive ?
- 패스워드와 같은 민감한 정보가 화면에 출력되지 않도록 합니다.
- 단, 상태파일에는 그대로 평문으로 기록됩니다. => backend 구성 필요 !
$ terraform apply -auto-approve
var.my_password
Enter a value: 입력 시 노출 안됨 !
변수 입력 방식과 우선 순위
변수가 선언되는 방식에 따라 변수의 우선 순위가 존재합니다.
이를 적절히 사용하여 로컬 환경과 빌드 서버 환경에서의 정의를 다르게 가져가거나,
프로비저닝 파이프라인을 구성하는 경우 외부 값을 변수에 지정할 수 있습니다.

CLI 실행 시 명령줄에 -var 인수로 지정 또는 -var-file로 파일을 지정하는 방식이 가장 우선 순위가 높습니다.
$ terraform apply -auto-approve -var=my_var=var1
$ terraform apply -auto-approve -var-file="var.txt"
Ouput 블록
프로비저닝 수행 후의 결과 특정 속성 값을 확인하는 용도입니다.
모듈 간 또는 워크스페이스 간 데이터 접근 요소로도 활용할 수 있습니다.
- Output 사용 예시
output "instance_ip_addr" {
value = "http://${aws_instance.server.private_ip}"
}
다른 예로, 로컬 파일을 하나 생성한다고 하였을 때 프로비저닝이 완료되기 전까지는 파일의 ID 값을 알 수 없습니다.
이 때, 파일의 ID를 Ouput으로 선언해놓으면 프로비저닝 이후 ID 값을 출력할 수 있습니다.
Step1. 로컬 파일 생성
Step2. 파일 ID 값 출력 확인
$ terraform apply -auto-approve
```
Outputs:
file_id = "a94a8fe5ccb19ba61c4c0873d391e987982fbbd3"
$ terraform output
file_id = "a94a8fe5ccb19ba61c4c0873d391e987982fbbd3"
$ terraform output -raw file_id
a94a8fe5ccb19ba61c4c0873d391e987982fbbd3
Provider
- Terraform은 바이너리 파일을 시작으로 로컬 환경이나 배포 서버와 같은 원격 환경에서 원하는 대상 리소스를 호출하는 방식으로 실행됩니다.
- 각 Provider의 API 구현은 서로 다르지만 Terraform의 고유 문법으로 동일한 동작을 수행하도록 구현되어 있습니다.
- Provider는 플러그인 형태로 Terraform에 결합되어 Cloud, SaaS, 기타 서비스 등 API를 사용하여 동작을 수행합니다.
- Provider는 Terraform이 관리하는 리소스 유형과 데이터 소스를 사용할 수 있도록 연결합니다.
- Provider 구성 시에는 대상 리소스와의 연결을 위한 인증 정보가 요구됩니다.
- Provider는 Terraform 실행 파일과는 별개로 자체 관리되고 저장소에 게시됩니다.

- Tier
- Official : 공식 Provider로 HashiCorp에서 소유 및 관리합니다.
- Partner : HashiCorp 외 기술 파트너가 소유하고 관리합니다.
- Community : 개별 관리자와 그룹에서 Terraform 레지스트리에 게시하고 관리합니다.
Module
모듈은 테라폼 구성의 집합으로 재활용하기 위한 템플릿을 의미합니다.
- 단일 파일 구조로 업데이트를 지속하면 다음과 같은 문제가 발생합니다.
- 구성 파일에서 원하는 항목을 찾고 수정하는 작업이 점점 어려워집니다.
- 리소스 간 연관 관계가 복잡해질수록 변경 작업에 따른 영향도를 분석하기 어려워집니다.
- 개발/스테이징/운영 환경으로 구성된 경우 비슷한 형태의 구성이 반복되어 업무 효율성이 떨어집니다.
- 새로운 프로젝트를 구성하는 경우 기존 구성에서 취해야 할 리소스 구성과 종속성 파악이 어렵습니다.
- 모듈의 구성
- 루트 모듈 : Terraform을 실행하고 프로비저닝하는 최상위 모듈
- 자식 모듈 : 루트 모듈의 구성에서 호출되는 외부 구성 집합
- 모듈의 장점
- 관리성 : 서로 연관있는 리소스를 하나의 모듈로 구성하여 관리할 수 있습니다.
- 캡슐화 : 논리적으로 묶여서 독립적으로 프로비저닝 및 관리되며, 그 결과는 필요한 항목만을 외부에 노출시킵니다.
- 재사용성 : 이후 유사한 아키텍처에서 검증된 모듈을 바로 사용할 수 있습니다.
- 일관성과 표준화 : 모듈을 활용하는 워크플로우는 일관성을 제공하고 서로 다른 환경과 프로젝트에도 이미 검증된 모듈을 사용해 복잡한 구성과 보안 사고를 방지할 수 있습니다.
A. 자식 모듈 호출하기
Step1. 자식 모듈 작성
/home/okms1017/module/terraform-random-pwgen/main.tf
Step2. 루트 모듈 작성
/home/okms1017/root/main.tf
Step3. 루트 모듈에서 자식 모듈 호출 결과
"isDB" 입력 변수의 유무에 따라
'mypw1' 객체는 10자리 일반 패스워드가 생성되었고,
'mypw2' 객체는 16자리 특수문자 조합 패스워드가 생성되었습니다.
$ terraform init && terraform apply -auto-approve
```
Apply complete! Resources: 4 added, 0 changed, 0 destroyed.
Outputs:
mypw1 = {
"id" = "first-pup"
"pw" = "xXQoXm6iSQ"
}
mypw2 = {
"id" = "popular-rabbit"
"pw" = "cS%NBvyJxk3nVqRL"
}
이렇듯 입력 변수의 값을 다르게 줌으로써 모듈을 재활용할 수 있습니다.
B. AWS VPC 모듈 활용하기
Step1. VPC 모듈 다운로드
$ git clone https://github.com/terraform-aws-modules/terraform-aws-vpc/

$ tree terraform-aws-vpc/examples -L 1
terraform-aws-vpc/examples
├── simple

$ tree terraform-aws-vpc/examples -L 2
terraform-aws-vpc/examples
├── simple
│   ├── README.md
│   ├── main.tf
│   ├── outputs.tf
│   ├── variables.tf
│   └── versions.tf
└── vpc-flow-logs

$ cd terraform-aws-vpc/examples/simple
$ ls *.tf
main.tf  outputs.tf  variables.tf  versions.tf
$ cat main.tf
Step2. VPC 배포 결과
$ terraform init && terraform apply -auto-apporve
$ terraform output
```
vpc_arn = "arn:aws:ec2:ap-northeast-2:732659419746:vpc/vpc-0871d51fa3ec86a05"
vpc_cidr_block = "10.10.0.0/16"
vpc_enable_dns_hostnames = true
vpc_enable_dns_support = true
```
$ terraform state list
data.aws_availability_zones.available
module.vpc.aws_default_network_acl.this[0]
module.vpc.aws_default_route_table.default[0]
module.vpc.aws_default_security_group.this[0]
module.vpc.aws_route_table.private[0]
module.vpc.aws_route_table.private[1]
module.vpc.aws_route_table.private[2]
module.vpc.aws_route_table_association.private[0]
module.vpc.aws_route_table_association.private[1]
module.vpc.aws_route_table_association.private[2]
module.vpc.aws_subnet.private[0]
module.vpc.aws_subnet.private[1]
module.vpc.aws_subnet.private[2]
module.vpc.aws_vpc.this[0]

2. Terraform 배포하기
VPC 배포
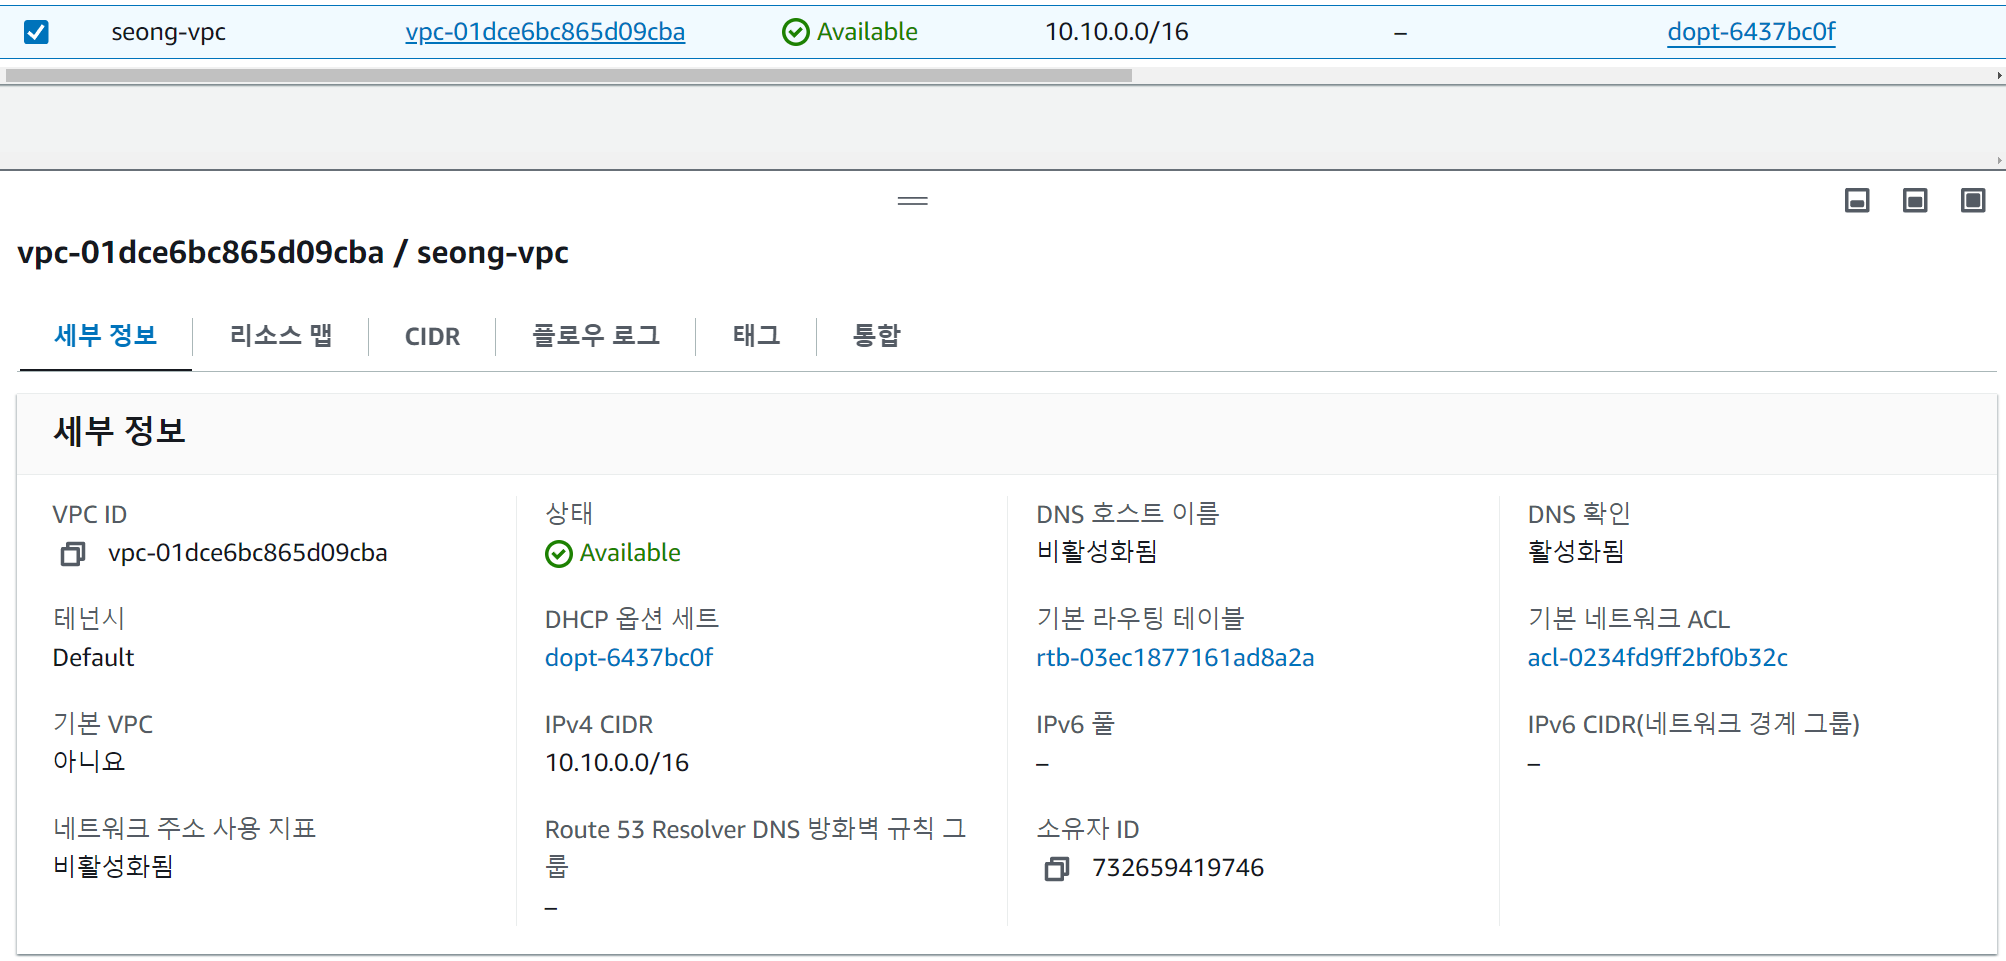
* DNS 옵션 : '비활성 → 활성' 변경

Subnet 배포


Internet Gateway 배포

IGW로 전달하는 디폴트 라우팅 추가


보안 그룹 배포


EC2 인스턴스 배포


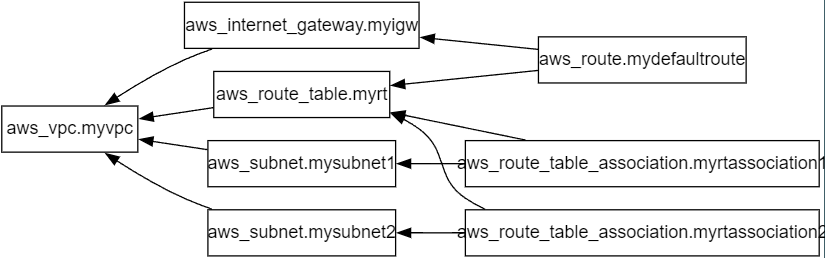
$ terraform state list
data.aws_ami.my_amazonlinux2
aws_instance.myec2
aws_internet_gateway.myigw
aws_route.mydefaultroute
aws_route_table.myrt
aws_route_table_association.myrtassociation1
aws_route_table_association.myrtassociation2
aws_security_group.mysg
aws_security_group_rule.mysginbound
aws_security_group_rule.mysgoutbound
aws_subnet.mysubnet1
aws_subnet.mysubnet2
aws_vpc.myvpc
$ terraform console
> data.aws_ami.my_amazonlinux2.id
"ami-0972fbae82d8513f6"
> data.aws_ami.my_amazonlinux2.image_id
"ami-0972fbae82d8513f6"
> data.aws_ami.my_amazonlinux2.name
"amzn2-ami-hvm-2.0.20240412.0-x86_64-ebs"
> data.aws_ami.my_amazonlinux2.owners
tolist([
"amazon",
])
> data.aws_ami.my_amazonlinux2.platform_details
"Linux/UNIX"
> data.aws_ami.my_amazonlinux2.hypervisor
"xen"
> data.aws_ami.my_amazonlinux2.architecture
"x86_64"
$ MYIP=$(terraform output -raw myec2_public_ip)
$ while true; do curl --connect-timeout 1 http://$MYIP/ ; echo "------------------------------"; date; sleep 1; done
Web Server</h1>
------------------------------
Sun Apr 28 03:13:52 KST 2024
Web Server</h1>
------------------------------
Sun Apr 28 03:13:53 KST 2024
[출처]
1) CloudNet@, AEWS 실습 스터디
Terraform by HashiCorp
Terraform is an infrastructure as code tool that enables you to safely and predictably provision and manage infrastructure in any cloud.
www.terraform.io
3) https://developer.hashicorp.com/terraform?product_intent=terraform
Terraform | HashiCorp Developer
Explore Terraform product documentation, tutorials, and examples.
developer.hashicorp.com
4) https://registry.terraform.io/
Terraform Registry
registry.terraform.io
5) https://spacelift.io/blog/terraform-tfvars
Terraform .tfvars files: Variables Management with Examples
.tfvars files are the best and most common way to manage variables in Terraform. Learn how to use them effectively in your IaC projects.
spacelift.io
'AWS > EKS' 카테고리의 다른 글
| AEWS2 스터디 완주 후기 🎉 (2) | 2024.05.07 |
|---|---|
| [AEWS2] 8-2. Terraform으로 EKS 배포하기 (1) | 2024.04.28 |
| [AEWS2] 7-2. EKS CI/CD - ArgoCD (1) | 2024.04.21 |
| [AEWS2] 7-1. EKS CI/CD - Jenkins (3) | 2024.04.21 |
| [AEWS2] 6-5. Kyverno (2) | 2024.04.13 |


